
")


English tutorial
Renault graphics activation and skin installation for MN3 v1.0.15.1 v1.0.13.3
Warning – No liability is assumed for errors or unexpected consequences The user takes responsibility for its actions
WARNING
Some of the settings of Micom Manager or the pressure of keys whose functionality is unknown, can lead to a block of the Medianav which cannot be recovered and requires repair by the official network.
Pay close attention to the keys of the Micom Manager that are pressed during the changes.
1 Introduction
The Medianav is in effect a computer, equipped with its own operating system.
The graphics of Medianav can be changed replacing the original images with other ones amended as needed by means of the installation of a so “skin”.
* The first skins were developed on the basis of Renault graphics, which can be activated by Micom Manager.
* The new and previous skins are now available in both Renault graphic format and Dacia graphic format.
* In case you have a skin prior to the conversion in the double format, we suggest you download the new version but in any case the instructions * for switching the format of the graphics are also maintained in the guide.
* The modification requires to switch to Renault graphics mode, which can be done accessing the Micom manager, which is a setting menu that is hidden to the user and the access to which requires the user to perform a particular enabling procedure and enter access codes.
* In case of old skin format (only Renault based), first chance graphic from Dacia to Renault, and once the Renault graphics are activated, you can then use the installation files of the modified skin.
* Different models of Medianav exist and the access codes are different.
* Therefore, before performing any operation, it is important to know which is the version of your own Medianav.
Present guide only applies to model Medianav MN3.
1 Identify your model of Medianav
Different models of Medianav exist:
- Medianav Standard (indicated as MN1)
- Medianav Evolution (indicated as MN2)
- Medianav Evolution 2 or Smart Evolution (indicated as MN3)
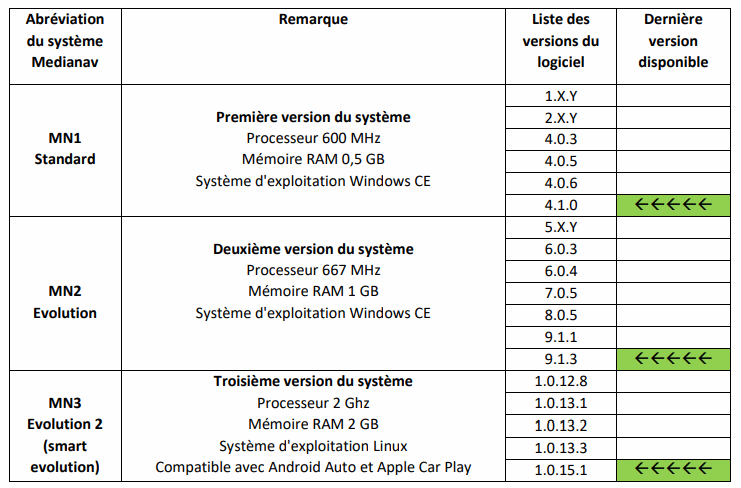
* The Medianav Standard (MN1) is the first version of the multimedia system. It is based on a 600 MHz processor with 0,5 GB RAM and Windows CE operating system. The last official software version is version 4.1.0.
* The Medianav Evolution (MN2) is the second version of the multimedia system. It is based on a 667 MHz processor with 1 GB RAM and Windows CE operating system. The last official software version is version 9.1.3.
* The Medianav Evolution 2 or Smart Evolution (MN3) is the third version of the multimedia system. It is based on a 2 Ghz processor with 2 GB RAM and Linux operating system. MN3 is compatible with Android Auto and Apple Car Play. The software versions start from release 1.0.XX.Y, and up today, the last software version is version 1.0.15.1.
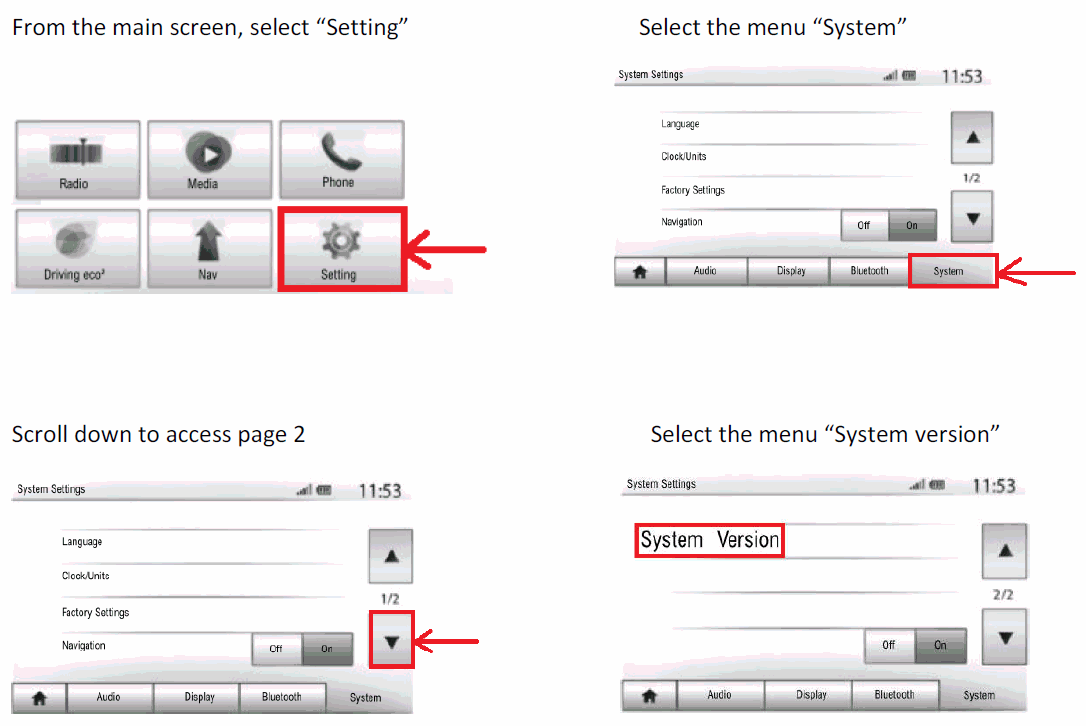
How to identify your own Medianav model?
The simplest way to identify your own Medianav model is to check the installed software version.
- If the software version is any version identified by the identifying code 4.X.Y or lower, then it is a Medianav Standard (indicated as MN1)
- If the software version is any version identified by the identifying code between 5.X.Y and 9.X.Y, then it is a Medianav Evolution (indicated as MN2)
- If the software version is any version identified by the identifying code 1.0.XX.Y or higher, then it is a Medianav Evolution 2 or Smart Evolution (indicated as come MN3)
- [at the moment no Medianav MN4 is still present]
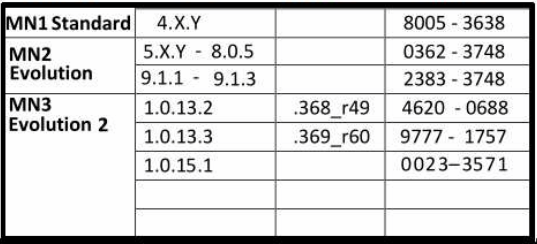
Next, a table is reported in which the various software versions of Medianav are presented.
NOTE 1:
Better still further versions of Medianav exist if one considers the presence of DAB+ tuner, which was introduced with the special edition Duster Techroad and later only it was extended to all the models
NOTE 2:
Medianav MN3 is the version currently installed on new cars and therefore it is the version for which new official updates will be released. We suggest to refer to Dacia official web site to check if new updates are available.
The access codes
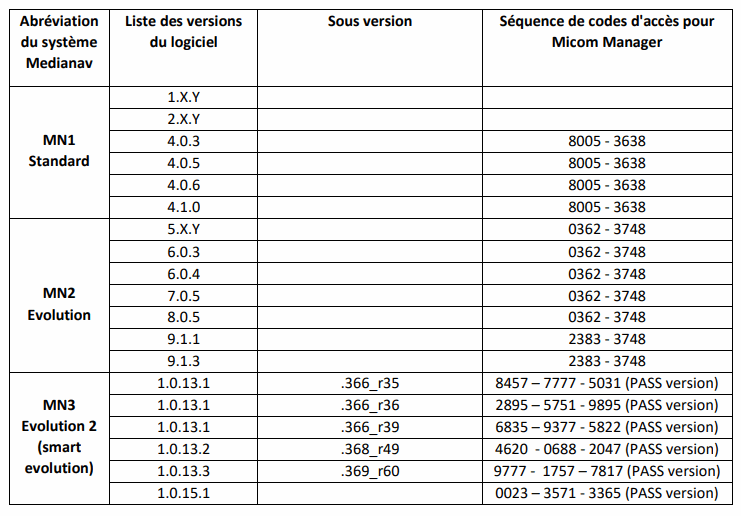
Next you can find a table with the access codes corresponding to the various software versions ofMedianav.
Table of access codes for the various software versions of Medianav
Open the access page in display mode only
Watch a video tutorial or continue reading.
 viewtopic.php?f=83&t=188
Access the following page:
On the page that displays the software version, press the indicated points from 1 to 5 in the indicated sequence, that is, first press the point indicated with “1”, then the point indicated with “2”, etc. up to the point indicated with “5”.
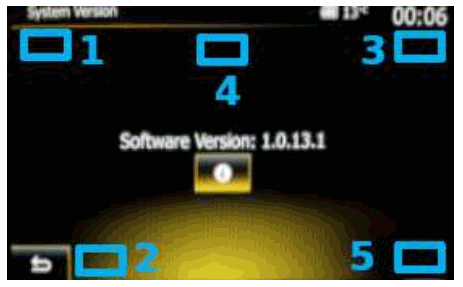
In case of difficulties in identifying the pressure points, the following identification mask can be printed and cut out.
A window for entering a code appears on the screen.
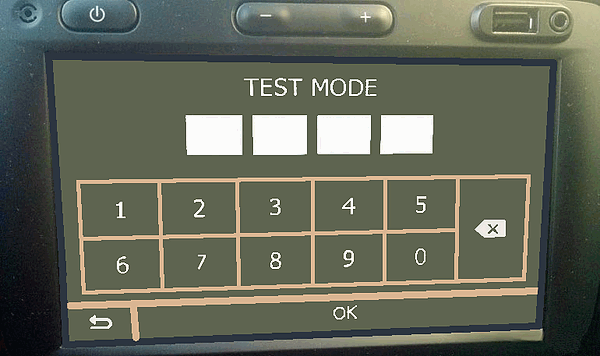
Using the on-screen keyboard:
- Enter the first code (Note: Refer to the code table to find the correct one for your Medianav
software version)
- Press the OK button

Using the back key, delete the previously entered code
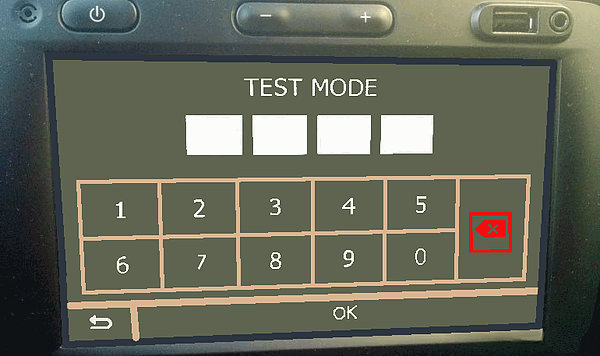
Using the on-screen keyboard:
- Enter the second code (Note: Refer to the code table to find the correct one for your Medianav
software version)
- Press the OK button

The following screen appears:
Open the login page in edit mode
* To access the access page in edit mode, the procedure is the same as described, but before starting it, a USB memory key containing an enabling file must be inserted into the USB socket of the Medianav.
* The enable file is actually an empty file but its presence on the memory stick is required to enable the editing functionality.
* What is really important is the name of the file which is different according to the software versions of the
Medianav:
- File name for the Medianav MN1 version mcmtest_activate.ini
- File name for Medianav MN2 version mcmtest_activate_4medianav.ini
- File name for version Medianav MN3 mcmtest_activate.ini
Creating the file is a very simple operation and can be done in an autonomous way.
For example from a PC (from MAC the procedure is similar), simply open the system text editor program "Notepad" or "Note pad", leave the content blank and press "File" "Save as" assigning the name correct for your Medianav system as reported on the previous page.
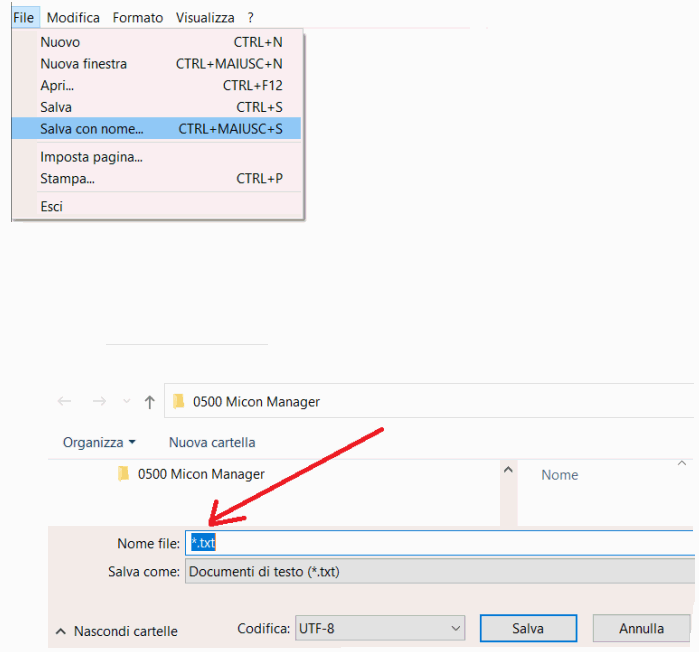
* Copy the file so created into a USB memory stick (max 32 GB) formatted in FAT32 format.
* Insert the USB memory stick into the USB socket of the Medianav and repeat the procedure described above to access the login page.
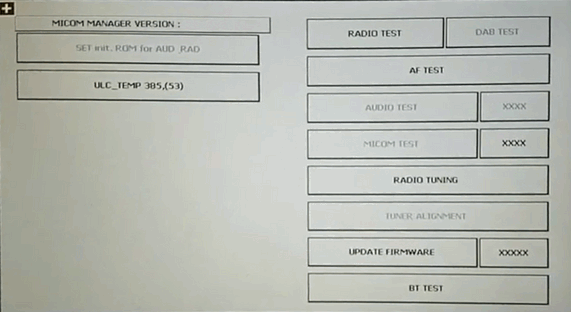
* In the same screen which opens, the “MICOM TEST” key will now be enabled through which get access to the settings page.
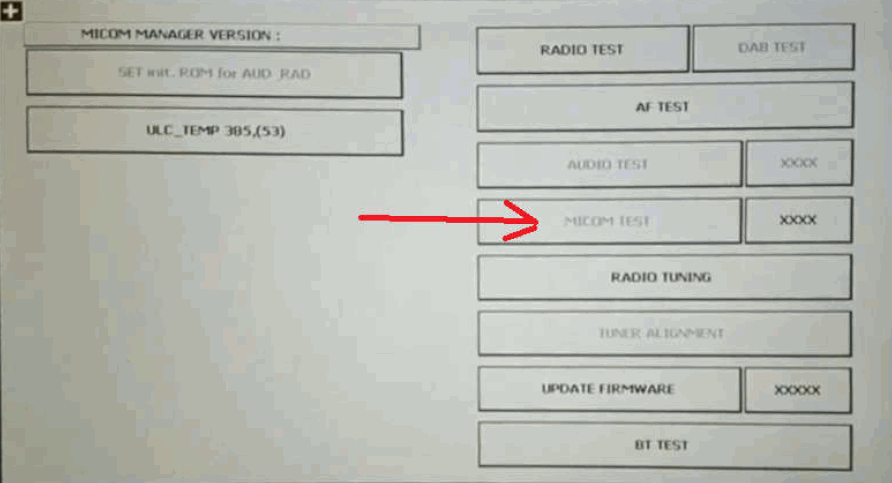
Access to Micom Test page – Screen is relative to MN3 1.0.15.1
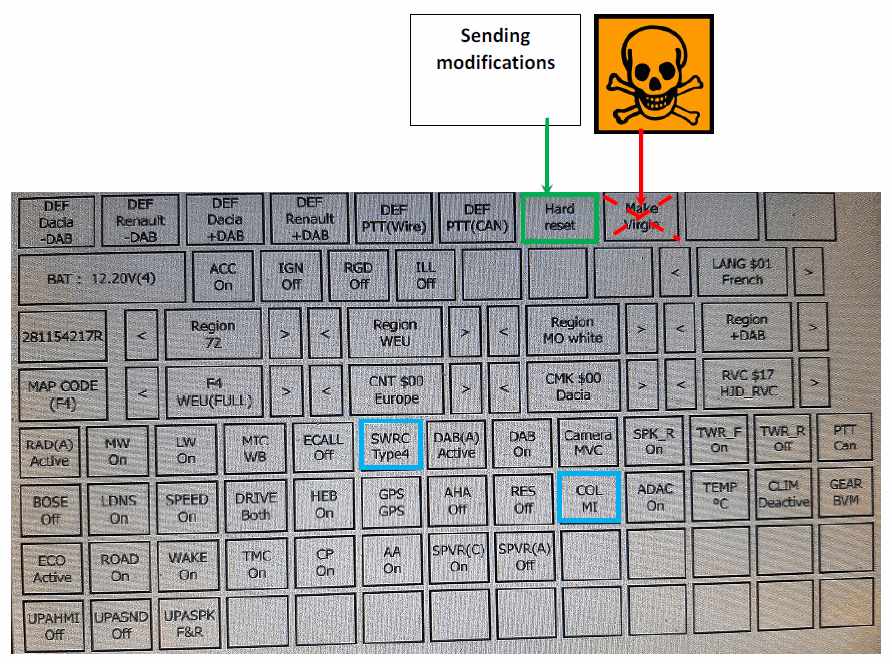
WARNING
* Some settings of the Micom Manager or the pressure of keys whose functionality is unknown, can lead to a block of the Medianav which is not recoverable and requires repair via official network.
* Pay close attention to the Micom Manager keys you press while editing and only perform the operations indicated in the following.
* Press the key “COL M0” -> the value changes into “COL M1” which corresponds to Renault graphics
* In the case of “MUTE” control malfunctioning on steering wheel controls (for Dacia), check the setting SWRC to enable the button.
* Press the key “Hard Reset” to confirm the change
WARNING: do not press the “Make Virgin” button which irreversibly resets the Medianav.
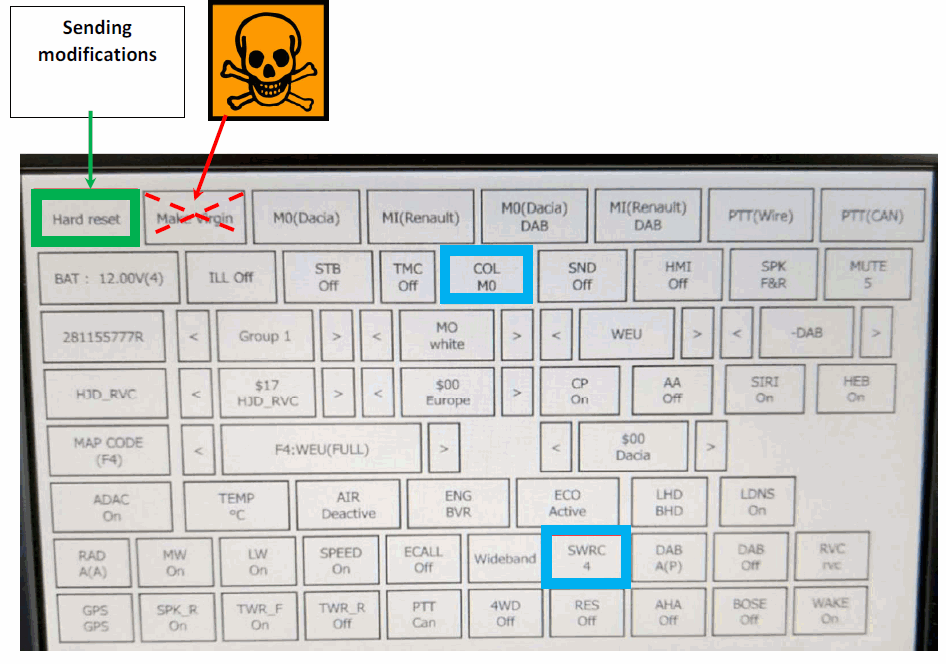
Access to Micom Test page – Screen is relative to MN3 1.0.13.3
WARNING
Some settings of the Micom Manager or the pressure of keys whose functionality is unknown, can lead to a block of the Medianav which is not recoverable and requires repair via official network.
Pay close attention to the Micom Manager keys you press while editing and only perform the operations indicated in the following.
- Press the key “COL M0” -> the value changes into “COL M1” which corresponds to Renault graphics
- In the case of “MUTE” control malfunctioning on steering wheel controls (for Dacia), check the setting SWRC to enable the button.
- Press the key “Hard Reset” to confirm the change
WARNING: do not press the “Make Virgin” button which irreversibly resets the Medianav.
Skin installation
Warning:
* before installing the ski nit is MANDATORY to activate Renault graphics – Do not installa the skin if you have not activated first the Renault graphics
* Installation must be carried out with the ENGINE ON to prevent the timed automatic shutdown of the Medianav during installation
* Skin installation may require some minutes
During installation some changes on the screen will occur.
INSTALLATION ENDS WITH AN AUTOMATIC RESTART OF THE MEDIANAV (YOU WILL SEE THE SHUTDOWN AND RESTART WITH THE BOOT LOGO)
DO NOT REMOVE THE INSTALLATION USB MEMORY BEFORE RESTART OF THE MEDIANAV.
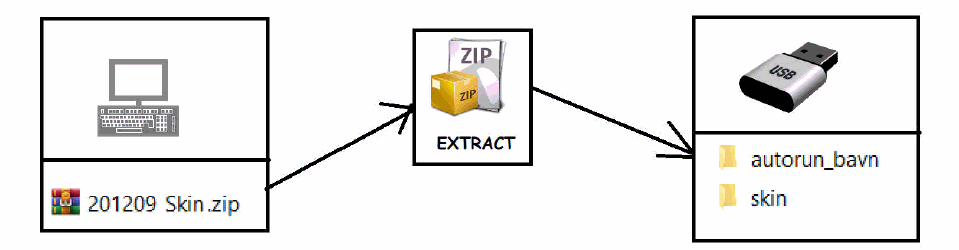
To install the skin, you need to copy the installation files contained in two folders onto a USB memory stick (32 GB, formatted in FAT32 format):
- autorun_bavn containing the file that commands the copy
- skin that contains the files to be copied
Note:
* The described structure applies to the skin files presented by the group while skin files prepared by other users may have a different structure. The installation file contained in the autorun_bavn folder depends on the structure of the files to be copied and, therefore, it is not possible to use an installation file prepared for a certain image folder structure with a structure other than that for which it was written.
Therefore pay attention to the fact that the skin you want to install consists of its own file structure to be copied and a corresponding installation file that is supplied with it.
* Usually the skin file is contained in a compressed archive, such as .zip or .rar.
* Use a corresponding decompression program to extract the contents of the compressed archive file and copy the contents to the root of the USB memory stick (32 GB, formatted in FAT32 format).
Once the USB memory stick is prepared, move to the car.
Step 1: turn on the engine of the car
DANGER: operations on the car must be carried out with the ENGINE ON to prevent the timed automatic shutdown of the Medianav from compromising the installation procedure
(DANGER OF FAILURE OF THE MULTIMEDIA SYSTEM).
Step 2: turn on medianav
Step 3: wait few seconds
Wait for any Bluetooth connection messages with your smartphone and confirm if necessary
Step 4: insert the USB memory stick into the USB socket of Medianav
Step 5: wait the information message that warns that no multimedia file has been found on the USB memory stick, YOU DO NOT NEED TO CONFIRM, JUST IGNORE THE MESSAGE
Step 6: copying starts, wait for Medianav to restart automatically.
Upon reboot the skin will be installed, remove the USB memory stick.
Note: on the USB memory stick there will be a file in text format containing the confirmation of the operations carried out. If you want to install a new skin, this file must be removed from the USB key before making a new installation.
Similar topic
Micom Manager Medianav MN3 v1.0.15.1, v1.0.13.3 & MN2
viewtopic.php?f=84&t=17928Les menus cachés de toutes les versions de Medianav
viewtopic.php?f=83&t=188Download mcmtest_activate.ini