
")


Compressed size: 2.61 GB
Uncompressed size: 2.97 GB
Cloud Google drive
Contains:
M.I.B More Incredible Bash v3.6.0.rar
VW Maps P350_N60S5MIBH3_EU.7z
How to delete invalid FEC/SWaP code from MIB unit.MP4
Patching Audi MMI - MHI2/MHI2Q (MIB2 High) units only (Activating Free Navigation Map Update)
Download M.I.B PPATCH COMPATIBILITY TABLE.pdf
 02img/PATCH COMPATIBILITY TABLE.pdf
1) Checking version of your unit (if patch fits your model).
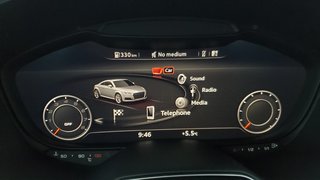
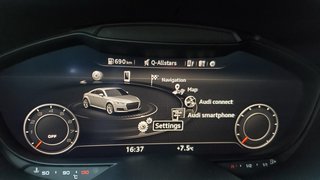
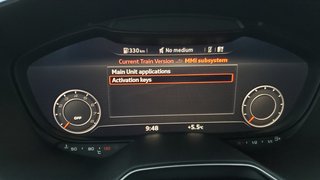
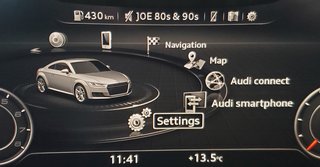
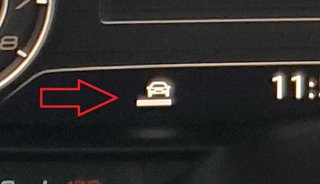
a. You do not need contact/ignition ON in your vehicle for this operation so just wake up your MMI system (using MMI power button for example) and hit MENU button.
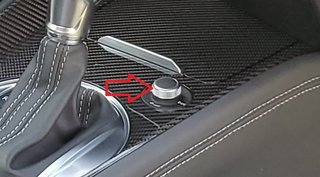
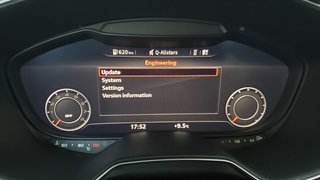
b. Use combination of buttons to enter RED ENGINEERING MENU.
(Keys Combination Table)
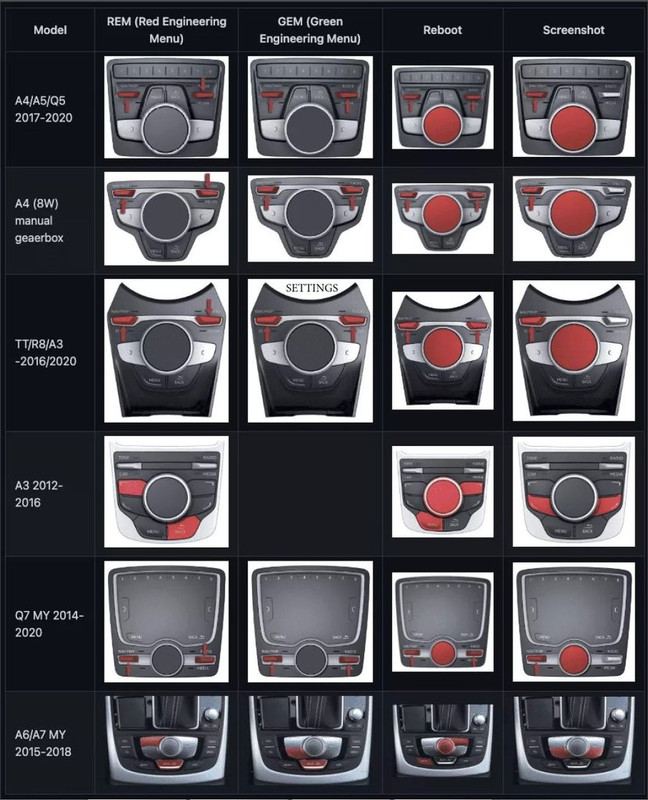
TIP: You can access Red Engineering Menu (REM) with simple combination of buttons but for MIB Green Engineering Menu (GEM) you have to be in SETTINGS Menu (At the contrary it won't work, at least in my case). Combination of buttons use starting with the left one. You hit at first the left one (keep it pressed), immediately after the right one (keep it pressed together with the fist one) and wait few seconds until menu show up. If you hit them at the same time, simultaneously, it won't work (I learned it on hard way). Same, to exit the Red Menu, use the identical combination of buttons.
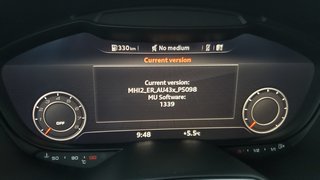
c. Enter in VERSION INFORMATION and take a photo (to have exactly the version for later use). If your version is starting with MHI2/MHI2Q you are good to go.

2) Preparing SD card and software for patching.
a. Download patching software from the included link .
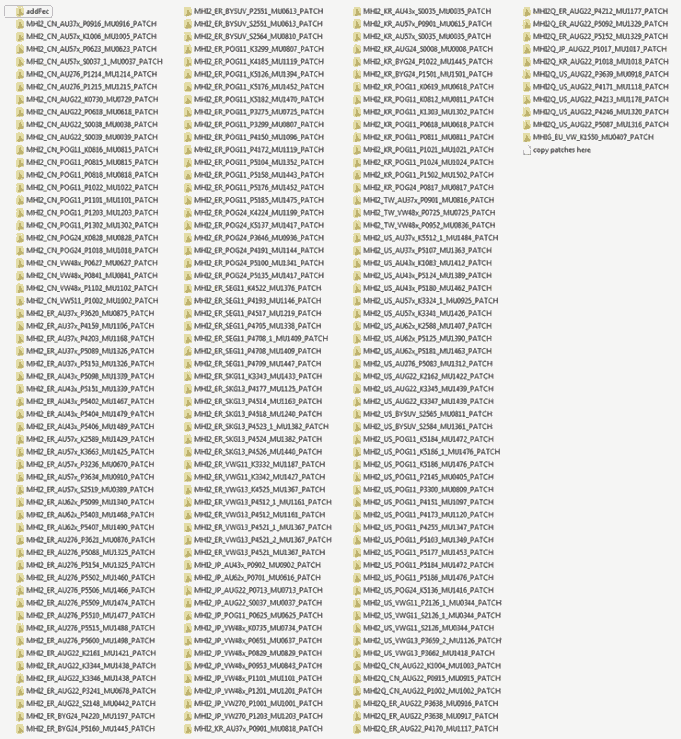
* Confirm presence of your FW in "Patch List" first. If missing, there is no point downloading large file (see figure 2).
Patch List
Download M.I.B More-Incredible-Bash-3.6.0.zip
INFO: Patching Software and Firmware are the latest edition. SW (8 JUN 2023) FW (26 September 2023).
b. Unzip it to your PC. In the main folder "M.I.B._More-Incredible-Bash-3.6.0" you will spot folder name "patches". Enter it and find your version of FW (firmware). If your version (use photo from Step 1 Figure 3) is present you have all necessary to continue (at the contrary you need to update your original FW). You can delete all others FW except yours (this is important step if you are going to use low capacity SD card - 4G minimum) but not necessary/essential because the MIB will automatically use the right version during patching process (this apply for SD card with 8G capacity and +).
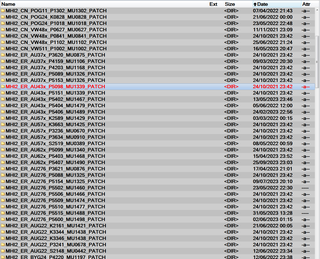
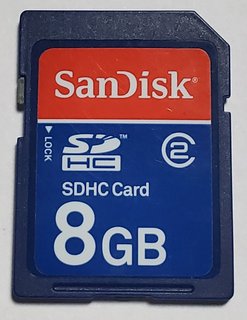
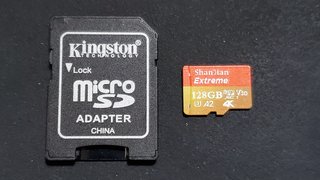
NOTE: You need SD card, not Micro SD with adapter for this process (designer of the SW emphasize that). You can use minimum 4G and, as I mentioned in this case, delete unnecessary FW in "patches" folder in order to free-up the space for backup process which you are going to perform before patching the unit (keep the card in UNLOCK position). Better solution is 8G SD card (depends what you got on the hands). By the way, for updating the maps I use Micro SD with adapter and it works great.
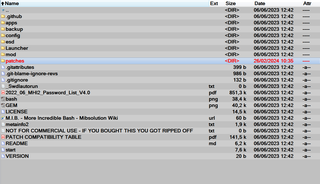
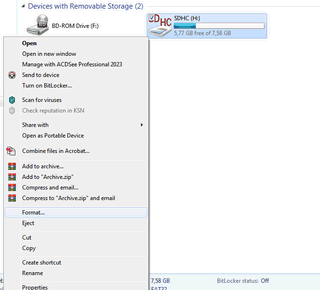
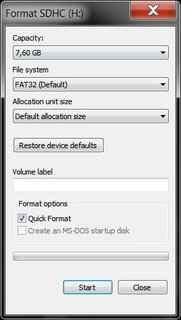
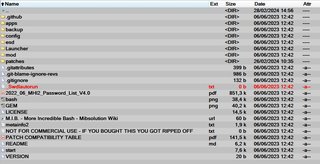
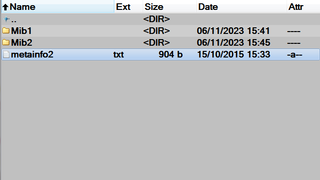
c. Format SD card (go to My Computer - right click on inserted and unlocked SD card - from drop-down menu chose "Format...") in FAT32 and copy all files and folders from "M.I.B._More-Incredible-Bash-3.6.0" to the root of SD card.
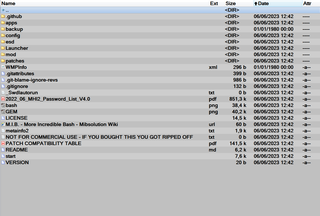
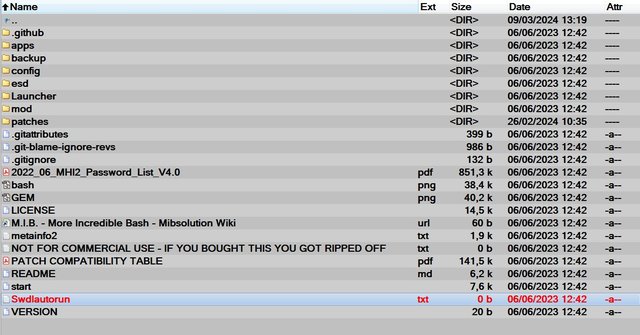
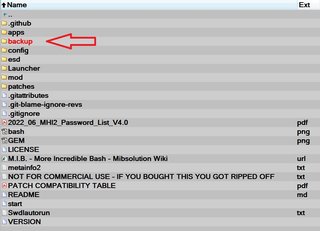
*Once copied, SD card should look like this.
NOTE: There are two ways to install MIB on your unit, MANUAL and AUTOMATIC. For manual installation (I prefer personally) your SD card is ready now. For Automatic you need to rename one file, but this will be explained in the next step.
==================================
After expiration of free code key (around 3 years) in your unit updating maps is not possible any longer except if your car has lifetime update code (FEC-Feature Enablement Code), in this case “023000ee” then, if you prefer regular update, you can always pay some extra money to AUDI and finally this alternative way.
I’ll try to explain in few steps procedure of patching. Idea is to present it as simple as possible for people who never did it before (with minimum knowledge of PC usage). All I present here is what I tested and executed with success on my personal vehicle. I’m not an expert so just simple and basic to make it work. You should know before execution that all you do and use is at your own risk! Sh**t can happen… Nobody runs away from it, me either…
STEPS:
1) Checking version of your unit (if patch fits your model).
2) Preparing SD card and software for patching.
3) Installing Green Menu to unit (MIB-More Incredible Bash).
4) Patching unit and verification added FEC (if key is properly installed).
5) Installing Map update.
*I have no time to stay long time in front of my computer so I’ll create material and post it step by step over time. Of course I’ll try to finish in a reasonable time frame.
==================================
3) Installing Green Menu to unit (MIB-More Incredible Bash).
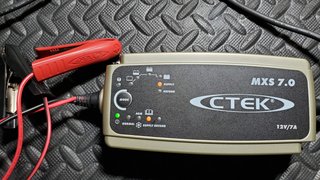
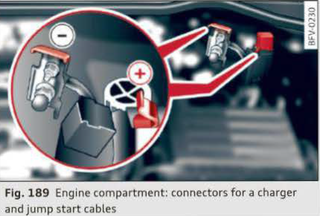
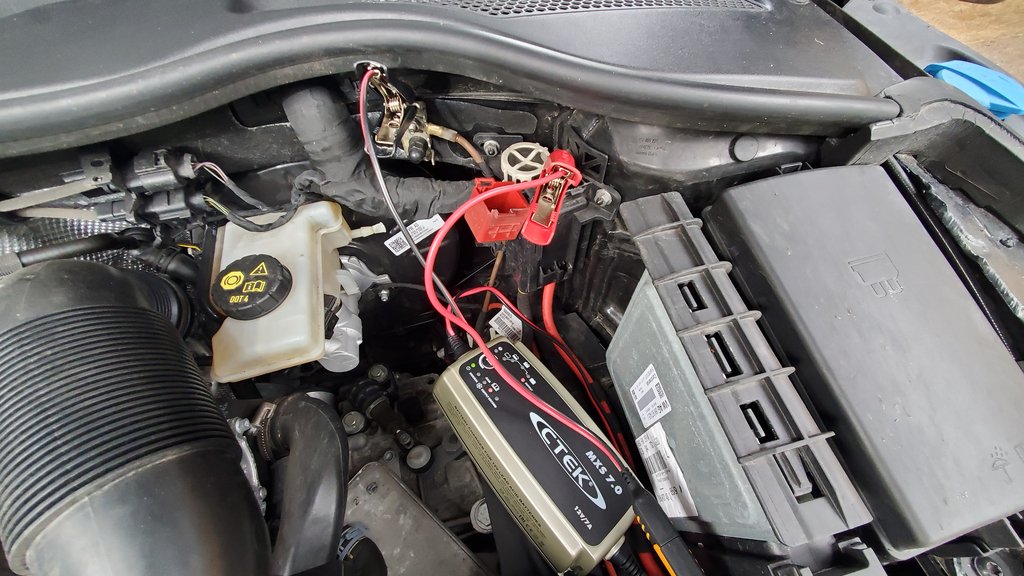
IMPORTANT: In order to perform successful installation of MIB software and Patching process, you need to turn the contact/ignition ON in your vehicle. This process drains power from your battery and in the case that you lost power supply during installation it might cause permanent damage on your vehicle, simply you can BRICK your unit. If car has good battery and it is well charged everything can go smoothly, but taking unnecessary risk is not reasonable. So from this stage you are going to need external power supply for your car (in 100% of videos/forums I have visioned/visited, people advice to crank your engine ON and it is WRONG). Designer of the MIB Software indicated that procedure has to be done with STOPED engine (unfortunately I didn't spot this on their site before performing operation - more about it in step 4) Patching...). So you should provide a charger with SUPPLY option/mode (many charger provide low power supply sufficient for charging battery but not for supplying vehicle processes like ventilation, headlight and other devices when ignition is ON) which will provide car with necessary power during standstill activities. So when you get one, connect it to the battery (directly to the battery or on to provided contacts in engine compartment) of your vehicle and chose the supply mode . Deactivate/turn-off everything in the car (ventilation, automatic headlights, heated seats and other heavy loads) in order to low down power consumption (even though your charger will be hot after finishing the operation what explains how much equipment is power demanding).
Example of Charger/Power Supply
Charging Connectors
* Once power issue solved you can start installation of the MIB Solution software using Manual or Automatic Installation procedure.
MANUAL INSTALLATION PROCEDURE
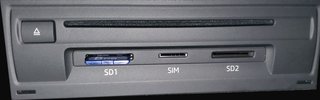
1. Take out all USB dongles, SD Cards and CD. Plug in previously prepared and unlocked (during installataion basic back-up will be performed so NO write protection on the SD card) MIB SD card in "SD1" socket of the car.
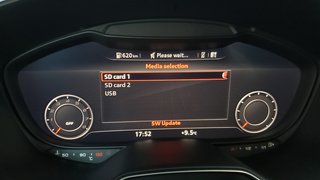
2. You do not need contact/ignition ON for this operation (It will work with ignition ON, what I did in my car). Just wake up your MMI system (step 1 figure 1).
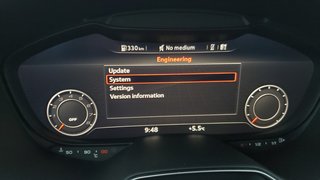
3. Go to Engineering Red Menu and chose "Update" or "Software Update" (depends of vehicle).
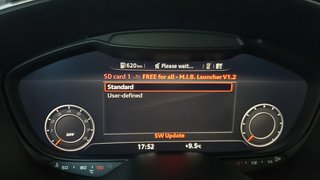
4. Chose "SD1" and then "Standard".
5. Scroll the list and check if next to the "Launcher" is [Y]. (If so it's perfect and that's the only one which should be updated at this time.)

6. Scroll to the bottom of the list and hit "Start Update" and then from next menu chose to "start update").
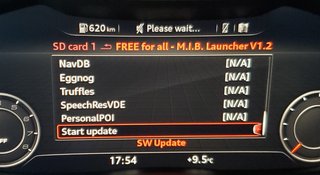

NOTE: Installation should take approximately 10 min. and the unit will restart/reboot several times (normally 3 times). During that process do not touch anything in the car (buttons, doors, controls...etc.) and the most important NEVER REMOVE YOUR SD CARD (not before this entire step n°3 is completely finished). Just stay patient and wait installation to be completed.
* I haven't took photos during the first installation (I didn't intend to make manual at the instance) so I'm not able to add screenshots for next few steps. (Sorry for that.)
7. After installation is finished you will see a summary of the installed packages, all completed will be marked [Y] or [OK] (in our case just for "Launcher").
8. Exit that screen (in my case by choosing "Continue" at the bottom of the list).
9. The next Screen will present something like this: "Start diagnostic tester: Main unit/version...". Press CANCEL (your system could reboot again after this).
* From this point your (GEM) Green Engineering Menu is installed.
NOTE: After installation you might notice a Software Version Management Error (SVM) in "5F-Information Electronics" via OBD and if so action should bee taken but I'll cover that question later in the text.
AUTOMATIC INSTALLATION PROCEDURE
1. Access from your PC to the root of the SD card. You will spot file "_Swdlautorun.txt". Rename that file to "Swdlautorun.txt" (simply delete underscore from the beginning of the filename).
SD card ready for Automatic Installation
2. Wake-up your MMI and then simply plug your SD card to "SD1" socket.
* In GEM I prefer to execute all operations with ignition ON because it happens often that after finalization of the installation system restart/reboot and immediately after it enter to a sleep mode leaving you in the confusion if process has been finished or not.
NOTE: It could take approximately 60 sec. for process to start. Unit will reboot into FW update (SWDL - Software Download) mode. During the process it's possible to have some information on the screen but, as always, do not touch anything and wait finalization of the installation. Entire process takes approximately 10 min. so be patient and wait (I haven't done this procedure so no idea how system will announce the successful installation but I guess that after few reboots progress message will appear or disappear). Once all operations has been done and it's safe to unplug your SD card think to rename again "Swdlautorun.txt" to "_Swdlautorun.txt" to avoid eventual automatic process on next card usage.
ACCESSING GREEN ENGINEERING MENU (GEM) / CHECKING SOFTWARE VERSION MANAGEMENT (SVM) ERROR
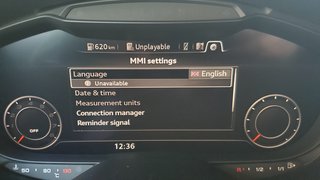
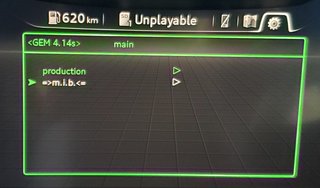
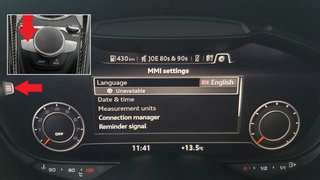
1. Enter the MAIN Menu and then to the SETTING Menu. Use combination of the buttons (Step 1 Figure 2) to access Green Engineering Menu (GEM).
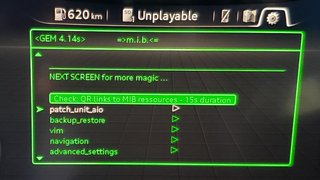
* If everything has been installed properly, now you should see Green Menu.

* To exit the menu just hit Menu button or Radio, Navigation...(you can simply open the door and Green Menu will disappear).
NOTE: After installation you might notice a Software Version Management Error (SVM) in "5F-Information Electronics" via OBD (like I did). MIB has capacity/function to fix that, but before you need to check if it is the case.
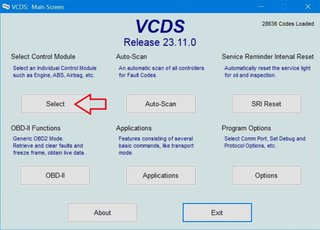
2. Take your diagnostic OBD tool (VAG-COM) with appropriate interface (OBDII Cable). Connect it to your vehicle and search for error (see photos).
* Lately OBDeleven is popular but because of it price I consider it as "User Unfriendly". So I'll use traditional "VCDS Ross-Tech".
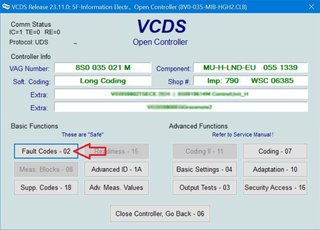
From the main menu/window select "Control Module"
Then "5F-Information Electronics"
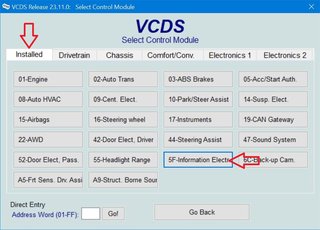
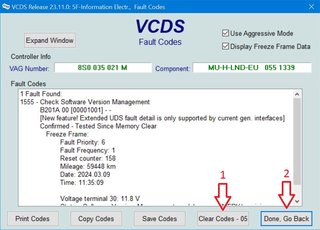
And finally "Fault Code"

Error List
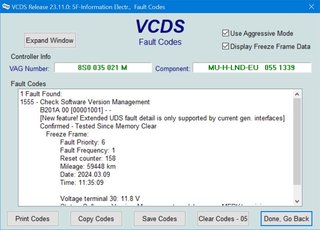
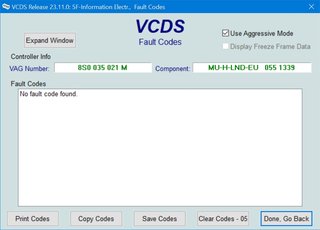
* If mentioned Error is present in the list (like on photo) then you should go to the next step, otherwise (not in list) your installation is finalized with success.
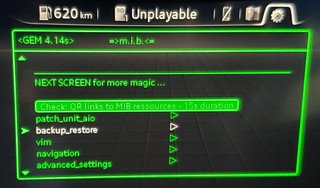
3. Enter GEM chose M.I.B. (GEM/MIB) and scroll to "beckup_restore". Execute "Beckup ~5 minutes".
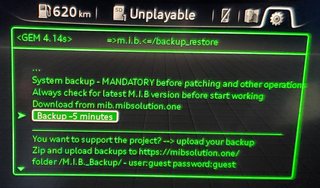
* You can perform full update as well but according to MIB Solution designers it is intended for cases where you have some issue and theirs assistance is needed. In that case they will need a full backup to be performed and sent to them.
TIP: During activities in GEM (for example, performing back-up ) it is important not to touch anything in the vehicle. No buttons, do not open the door, really don't touch anything because you will exit the GEM literally with anything you touche. Even if you stand still it could happen that your GPS system detect by TMC accident or something else in your vicinity and it will exit the GEM leaving you with idea that process has been terminated. Do not panic and most of all do not switch ignition off. The process is still active in the background but you have no idea if and when it going to finalize. So, enter GEM and go exactly to the same menu to activate last operation (in our example back-up). When you try to start the same procedure system will warn you that there is still a background process and it will show you progress menu/active list (you have to scroll down the list to see the last executed step). Only when you see confirmation that process has been terminated you can exit the GEM, switch off ignition and if necessary take out SD card.
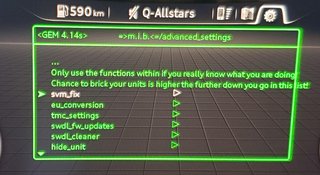
4. After Back-up go to GEM/MIB main menu and scroll to "advanced_settings" then to "svm_fix" and execute "Fix SVM error".
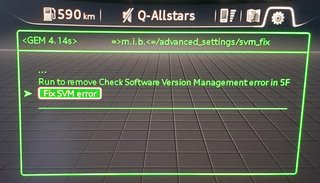
* Keep ignition ON because following execution will restart/reboot unit and immediately after go to a sleep mode so you won't be sure if everything is executed properly.
5. After reboot you can turn ignition OFF and go to REM. On the screen you are going to see new message like "Initializing Engineering..." and it will stay for 1-2 min. Once finished and menu REM is shown you just exit from it and go to the next step (I discovered this today 11.03.23 so if you skip this step, error can't be deleted with VCDS and after deleting it will appear again on next reading).
6. Take your diagnostic tool and verify the error again (Error List). Normally error will be still there. So you will "Clear codes" then "Done, go back" and read again "Fault Codes".
TIP: GEM should be installed only once on your unit. Program is executed from SD card so no card means no MIB (see picture when SD is not plugged). Wonderful about that is that when new release/version is available you just need to create new SD card with that new release and once plugged in the unit, you are going to operate that last version. Do not forget to save back-up folder to your computer. When you create a new SD you simply copy back the back-up folder saved on your PC or (if you keep the same SD without formatting it again) just replace all folders and files with the most resent MIB version except "backup" folder).
Plugged SD

Unplugged SD
Folder to save on PC
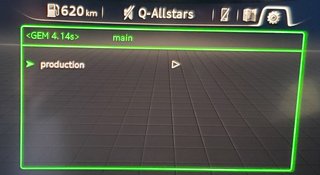
* In "production" section you have plenty options but be very careful what you are modifying. If you do not know exactly what you are doing, huge damage can be made...!!
4) Patching unit and verification added FEC (if key is properly installed).
1. Connect your vehicle to a power supply (step 3) and turn ignition ON (it's mandatory) but keep engine OFF.
2. If you still didn't, perform back-up of your system (step 3 - (GEM)/(SVM) - figure 3).
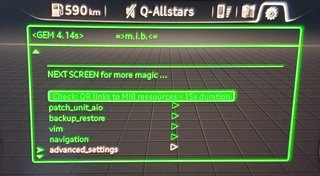
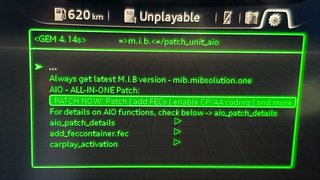
3. Enter GEM/MIB and scroll to "patch_unit_aio" enter it and start "PATCH NOW".
In this menu you have to patch firs your unit and then you can use the rest of the functions (add_fec...Carplay...).
* Stay patient, do not touch anything and wait until process terminate. You are going to see on your screen big white letters on the green background marked "SUCCESS". Unit will reboot and patching process is terminated.
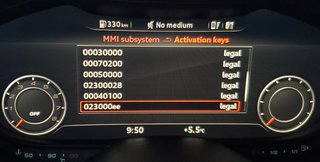
NOTE: You do NOT need to add FEC (023000ee) manually (using option in GEM). During patching procedure it will be added automatically.
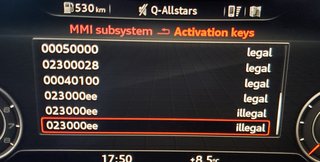
4. You can turn ignition OFF now and exit the GEM. Enter REM then "System" / "Activation Keys" and search "023000ee". Next to it should be marked "legal". It affirmative then your patching process was successful and you can update your unit with new maps for free.
* I performed my patching process with engine ON and next to the code appears "illegal". I was persistent and I patched again with the same result. Then I decided to abandon until I have enough time to do it properly. Next time I did it step by step. Power supply, engine OFF and everything went smoothly in 5 min. So if MIB designers say "engine off" there is a reason for it. Removing illegal/invalid keys is impossible without specific tools (OBDeleven according to my actual knowledge - the only one which can change service mode). VCDS is not capable to do it for the instance (on Ross-Tech forum designers refuse to reveal procedure saying that it is to complicated for ordinary users). Check the link for more information.
link - Invalid key suppression via OBDeleven
(How to delete invalid FEC/SWaP code from MIB unit)
https://www.youtube.com/watch?v=cDaJ9FRdCdA
Installation with running engine.
5) Installing Map update.
1. Download the maps from included link ("Update for 2024" P350_Q2).
* There is a 3 months newer version P370_Q3 (Q3=3rd quarter) but download is extremely slow at the moment and in step 6 I'll include more information.
Download VW Maps P350_N60S5MIBH3_EU
2. Copy downloaded content to the root of your formatted SD card (step 2 figure 3).
* On Audi site indicated size of the SD card is 32G. I use Micro SD 128G and it works fine.
3. Remove/unplug all media (SD cards, USB drives...CD) and insert SD card with map update. Wake up MMI system (step 1 figure 1) and keep ignition OFF.
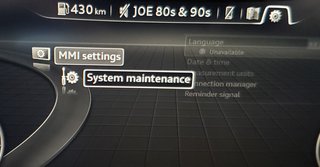
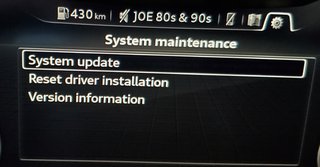
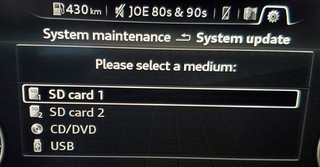
4. Go to update menu (from "Main Menu" go to "SETTINGS", then "MMI Settings", then "System Maintenenace", then "System update", then "SD1").
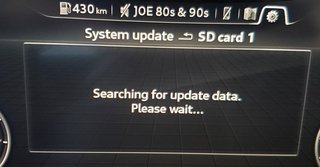
* System will take a moment to search data on SD card and to verify compatibility with your system including validity of the FEC.
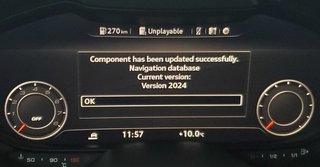
5. Only if everything is OK, you will be asked to confirm execution of the update with indicated version (Navigation Database Version 2024). Hit "Start Update".
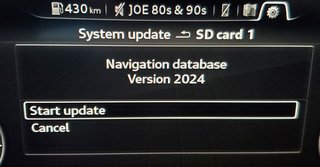
* Big progress bar will be sown and from that point update will last approximately 60 min. You can exit that bar and return to the main menu, start the engine, use MMI content, drive, navigate during update or simply leave the vehicle. In that case navigation will be performed in the background (DO NOT REMOVE SD CARD until update is terminated). Once terminated you'll be informed and after confirmation, hit "OK", system will reinitialize. Your maps are updated now!!
Background Update Progress Bar
Confirmation Menu
* In some cases update will not proceed as described (regular update). I read about another technique (I didn't obviously use it because everything goes well during regular update) and I'll present it briefly (but better explained then I had found it online). Before proceeding to this step check if your navigation region is properly selected by your unit.
- Enter GEM/MIB chose "navigation" and check "coding", ensure "SDS flag" is reflective of your map region (should be EU / ER). If wrong region is selected then update can not be performed and it should be corrected (after correction try again "regular map update").
Alternative Map Update
- Insert MIB SD card to slot SD1.
- Go to GEM/MIB, chose "advance_settings" and "clean SWDL". (SWDL= Software Download)
- Go back (...) to GEM/MIB main menu, chose "config" and "reboot" (reboot system using this specified GEM option, do not exit GEM and reboot using combination key - step 1 figure 2).
- After reboot, remove MIB SD card and insert SD with map update.
- Enter GEM and chose "production" then "RCC prod" then "SWDL" and "Enable SWDL".
- Exit GEM and enter REM, chose "Update" then "User Defined" (make sure NAVDB has "Y" next to it) and hit "update".
* This is alternative solution which could work if regular update fails. If patching was successful and FEC is ok (023000ee - legal) as well as chosen update for maps but after verification (figure 5) system refuse maps indicating that SD doesn't contain necessary update, you can try this alternative solution. Some users posted it after successful execution (maps has been updated on their units exclusively using this method).

* Comment obtenir le lien de téléchargement ?
* How do I get the download link?
viewtopic.php?f=77&t=1294* Vous êtes un visiteur? Comment s'inscrire sur ce forum
* You are a visitor? How to register on this forum
viewtopic.php?f=77&t=296